
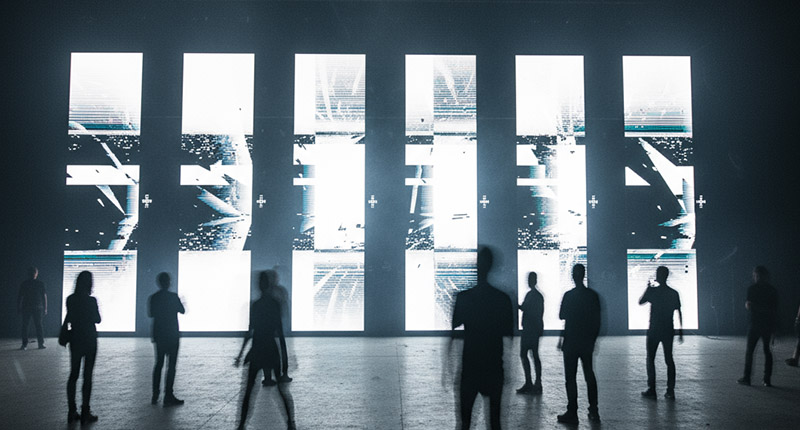
Haben Sie schon einmal versucht, ein Motiv vor einer riesigen LED-Wand zu filmen und dabei beobachtet, wie sich der Hintergrund in ein flackerndes, kaleidoskopartiges Durcheinander verwandelt? Willkommen in der Welt des Filmens vor LED-Wänden – wo Kamera- und Display-Timing oft kollidieren und entweder pulsierende “Stroboskop”-Effekte oder das berüchtigte Moiré-Muster erzeugen.
In diesem Leitfaden werden wir:
1. Erklären Sie, warum LED-Wände anfällig für visuelle Artefakte sind.
2. Beschreiben Sie die beiden häufigsten Probleme: stroboskopischer Effekt Und Moire.
3. Konkrete technische und praktische Lösungen anbieten.
4. Teilen Sie professionelle Tricks und einen schrittweisen Workflow zur Fehlerbehebung.
Warum LED-Wände Probleme bereiten
Eine LED-Wand ist ein riesiges Raster aus Leuchtdioden (LEDs). Bildwiederholfrequenz (wie oft das Raster pro Sekunde aktualisiert wird) und die Kamera Bildrate (Wie viele Bilder pro Sekunde aufgenommen werden) sind unabhängige Zeitmesssysteme. Wenn die beiden Frequenzen nahe beieinander liegen, aber nicht perfekt übereinstimmen, ist das Ergebnis entweder:
• ein schnelles Pulsieren oder “Stroboskoplicht” des Hintergrunds (stroboskopischer Effekt) oder
• eine Reihe neuer wellenförmiger oder pixeliger Muster (Moiré).
Man kann es sich so vorstellen, als würden zwei Schlagzeuger in leicht unterschiedlichen Tempi spielen – statt Harmonie erhält man visuelles Rauschen.
Stroboskopischer Effekt: Die unerwünschte Lichtshow
Was ist der stroboskopische Effekt?
Der stroboskopischer Effekt Dieses Problem tritt auf, wenn die Kamera die LED-Wand während ihrer Ein-/Ausschaltzyklen erfasst. Wenn der Verschluss der Kamera eine Mischung aus Ein- und Aus-Zuständen abtastet.
Die LED-Wand zeigt den Inhalt nicht kontinuierlich an; sie aktualisiert sich schnell, typischerweise 50- bis 60-mal pro Sekunde (oder schneller). Ihre Kamera nimmt ebenfalls in bestimmten Intervallen Bilder auf, üblicherweise 24, 30 oder 60 Bilder pro Sekunde. Wenn diese beiden Frequenzen nicht exakt übereinstimmen, entsteht ein visueller Effekt, der dem Takten zweier Metronome mit leicht unterschiedlichen Geschwindigkeiten entspricht – ein pulsierendes oder flackerndes Bild, das die gesamte Wand wie ein Stroboskop oder Flackern erscheinen lässt.
Warum passiert das?
LED-Wände nutzen eine Technik namens PWM (Pulsweitenmodulation) zur Steuerung der Helligkeitsstufen. Anstatt die Spannung zu variieren, schalten sie die LEDs sehr schnell ein und aus, wobei das Verhältnis der Einschaltzeit bestimmt, wie hell jede einzelne LED erscheint.
Stellen Sie sich vor, Sie versuchen, ein blinkendes Licht mit einer Kamera zu fotografieren. Wenn Sie es im eingeschalteten Zustand fotografieren, erscheint es hell. Wenn Sie es im ausgeschalteten Zustand fotografieren, erscheint es schwach. Fotografieren Sie es genau im Übergangsmoment, erhalten Sie ein ungleichmäßiges Helligkeitsbild. Multiplizieren Sie dies nun mit Millionen von LEDs, und Sie verstehen, warum die Sache so kompliziert wird.
Moiré-Muster: Der Interferenz-Albtraum
Was ist ein Moiré-Muster?
Moire ist ein Interferenzmuster, das entsteht, wenn zwei periodische Gitter –
Bei Aufnahmen von LED-Wänden entstehen Moiré-Muster, wenn das Sensorraster der Kamera (die Pixelanordnung) mit der Rasterstruktur der LED-Wand interagiert. Beide bestehen im Wesentlichen aus sich wiederholenden Mustern heller und dunkler Bereiche. Wenn diese nicht perfekt übereinstimmen, entstehen neue Muster, die der Wand wellenförmige, wirbelnde oder sogar pixelige Effekte verleihen können, die im Originalmaterial nicht vorhanden waren.
Die Mathematik hinter dem Wahnsinn
Moiré ist eine Manifestation von SchwebungsfrequenzDie Differenz zwischen zwei Ortsfrequenzen (dem Pixelabstand der Kamera und dem LED-Abstand der Wand) wird als Differenz zwischen zwei Frequenzen bezeichnet. Wenn zwei Frequenzen nahe beieinander liegen, aber nicht identisch sind, entsteht eine neue Frequenz, die der Differenz der beiden ursprünglichen Frequenzen entspricht.
Wenn der Pixelabstand Ihrer Kamera (der Abstand zwischen den Pixeln auf Ihrem Sensor) etwa das 1- bis 3-fache des LED-Abstands (der Abstand zwischen den LEDs an der Wand) beträgt, werden die Störungen am stärksten – Sie befinden sich im Gefahrenbereich.
Lösungen: Wie man sich wehrt
Nachfolgend finden Sie eine übersichtliche Werkzeugpalette. Wählen Sie die Kombination, die am besten zu Ihrer Konfiguration passt.
Stroboskopische Effekte bekämpfen
| Verfahren | So funktioniert es | Tipps |
| Bildratenanpassung | Passen Sie die Bildrate Ihrer Kamera an die Bildwiederholfrequenz der Wand an (z. B. 60 Hz → 60 fps; 30 fps, wenn die Wand synchronisieren kann). | Überprüfen Sie die tatsächliche Bildwiederholfrequenz; manche Wände können je nach Inhalt mehrere Frequenzen ausgeben. |
| Verschlusszeit (engerer Winkel) | Verkürzen Sie die Belichtungszeit, sodass jedes Bild einen einzelnen LED-Zustand erfasst. | Um dies auszugleichen, müssen Sie mit einer höheren ISO-Empfindlichkeit oder mehr Licht rechnen. |
| Global-Shutter-Kameras | Alle Pixel werden gleichzeitig ausgelesen, wodurch eine “Vermischung” der LED-Zustände reduziert wird. | Sie sind zwar teurer, aber für kritische Dreharbeiten oft lohnenswert. |
| Auslesemodi (ERS/Rolling-Shutter-Optimierung) | Manche Kameras bieten schnellere Sensorauslesungen, die problematische Zyklen “überspringen” können. | Prüfen Sie im Menü Ihrer Kamera, ob es Optionen wie “Schnellauslesung” oder “elektronischer Verschluss” gibt. |
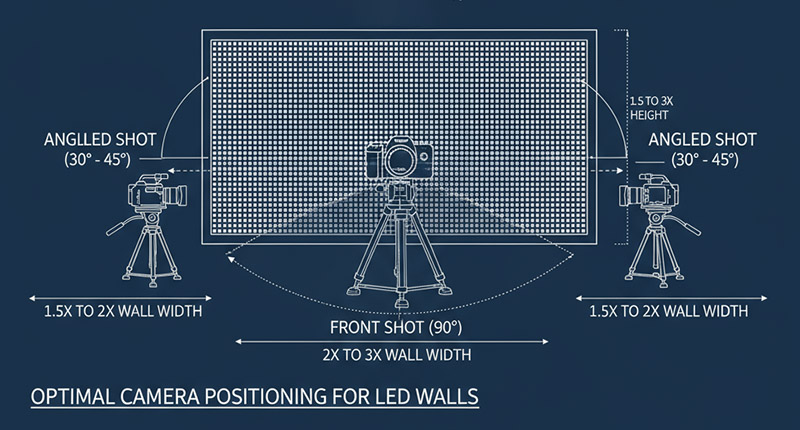
| Abstand und Winkel vergrößern | Durch einen größeren Abstand zwischen Kamera und Wand verringert sich der Anteil der Wand innerhalb des Sichtfelds des Sensors, wodurch die Wahrscheinlichkeit von Timing-Kollisionen sinkt. | Ein paar zusätzliche Meter können einen dramatischen Unterschied ausmachen. |
| ND-Filter / Blendenanpassungen | Eine geringfügige optische Dämpfung kann das Flimmern reduzieren, ohne die Zeitsteuerung zu verändern. | Sparsam verwenden; sie können die Gesamthelligkeit verringern. |

Moiré-Muster bezwingen
| Verfahren | So funktioniert es | Tipps |
| Abstand und Winkel einstellen | Kleinste Änderungen (einige Zentimeter oder eine leichte Drehung) führen dazu, dass die Sensor-Gitter-Beziehung aus der Resonanz gerät. | Testen Sie schrittweise; die Ergebnisse können über mehrere Zentimeter hinweg dramatisch variieren. |
| Leichte Unschärfe (leichte Unschärfe) | Eine leichte Unschärfe glättet das Interferenzmuster, ohne das Motiv weichzuzeichnen. | Die Unschärfe sollte minimal sein; zu starke Unschärfe kann die Wand verschwommen erscheinen lassen. |
| Pixelverschiebung oder Sensorverschiebung | Durch Verschieben des Sensors (oder durch Verwendung der Pixel-Shift-Technologie) ändert sich das Abtastgitter relativ zum LED-Gitter. | Nützlich bei hochwertigen spiegellosen Kameras/DSLRs, die dies unterstützen. |
| Auflösungskonflikt | Wählen Sie eine Kamera, deren Pixelanzahl sich nicht gleichmäßig durch die Pixelanzahl der Wand teilen lässt (oder umgekehrt). | Bei einer Wandauflösung von 1920×1080 Pixeln vermeidet ein 24-MP-Sensor häufig das 1:1-Verhältnis. |
| Spezieller “kamerafreundlicher” Modus | Einige LED-Wände verfügen über einen Modus, der die PWM-Frequenz auf ein Muster umschaltet, das weniger wahrscheinlich Störungen verursacht. | Rechnen Sie mit einem leichten Abfall der Farbtreue; testen Sie dies vor dem Dreh. |
Fortgeschrittene Techniken und Profi-Tricks
Die Sweet-Spot-Methode
Professionelle Kameraleute finden oft einen Sweet-Spot-Distanz– eine Position, an der sowohl stroboskopische als auch Moiré-Artefakte minimiert werden. Um dies zu erreichen, sind in der Regel einige Testaufnahmen erforderlich, das Ergebnis kann sich jedoch deutlich von Positionen unterscheiden, die nur wenige Zentimeter entfernt liegen.
Elektronische Lösungen
LED-Wandkamera-freundliche Voreinstellungen – Viele Hersteller bieten “Broadcast”- oder “Studio”-Modi an, die PWM- und Aktualisierungsmuster modifizieren.
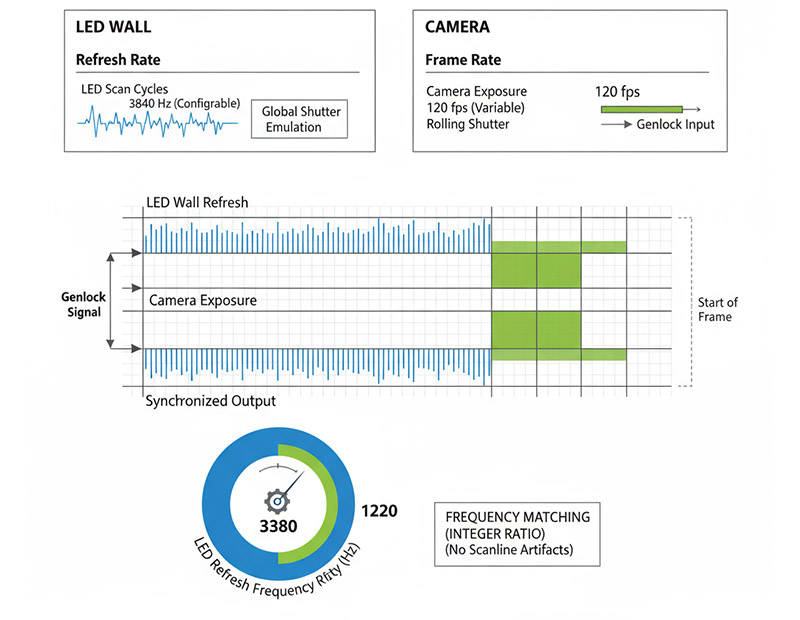
Echtzeit-Synchronisierung – Einige High-End-Systeme können die Bildwiederholfrequenz der Wand an das Frame-Timing der Kamera synchronisieren (z. B. Genlock oder PTP), wodurch das Flimmern vollständig eliminiert wird.
Ausgewogene Beleuchtung
Verwenden Sie zusätzliche Leuchten (Softboxen, Paneele oder Reflektoren), um das Licht an die Wandbeleuchtung anzupassen. Eine gleichmäßige Belichtung reduziert die wahrgenommene Wirkung von Stroboskop- oder Moiré-Effekten, insbesondere bei dynamischen Wandmotiven.
Workflow-Fehlerbehebung: Ihre Schritt-für-Schritt-Anleitung
| Schritt | Aktion | Worauf Sie achten sollten |
| 1️⃣ Vorab-Bewertung | Technische Daten der Testwand: Bildwiederholfrequenz (Hz), Pixelabstand, verfügbare “kamerafreundliche” Modi. | Prüfen Sie, ob die Wand auf 60 Hz, 50 Hz, 120 Hz usw. umgeschaltet werden kann. |
| 2️⃣ Testschüsse | Filmen Sie mit verschiedenen Bildraten-/Verschlusszeitkombinationen (z. B. 24 fps + 1/48 s, 30 fps + 1/60 s, 60 fps + 1/120 s). | Achten Sie auf die Flimmerintensität; wählen Sie die Einstellung mit dem am wenigsten sichtbaren Stroboskoplicht. |
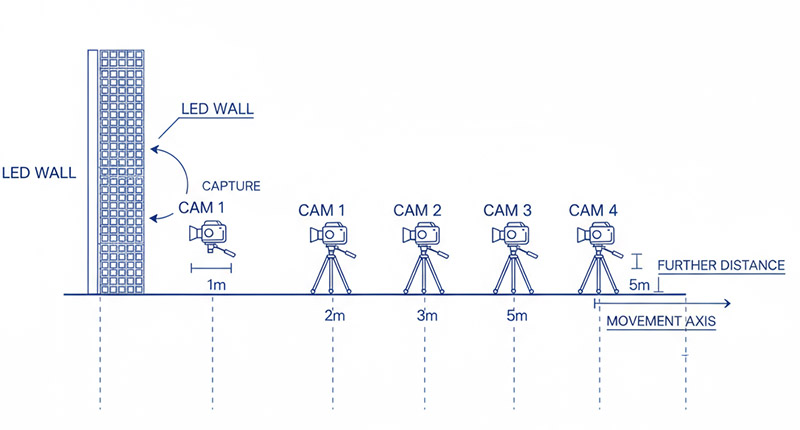
| 3️⃣ Positionierungsexperimente | Beginnen Sie mit einer Nahaufnahme und entfernen Sie die Kamera dann; versuchen Sie es auch mit leichten Winkeln (5–10°). | Achten Sie auf eventuelle Moiré-Muster; halten Sie das Motiv während der Justierung scharf. |
| 4️⃣ Feinabstimmung | Nehmen Sie Mikroanpassungen an Abstand, Winkel und Fokus vor, um beide Artefakte gleichzeitig zu minimieren. | Idealerweise sollte die Wand glatt und das Motiv scharf sein. |
| 5️⃣ Inhaltsprüfung | Prüfen Sie, ob der Inhalt der Wand (schnelle Bewegungen, hochfrequente Muster, einfarbige Flächen) unterschiedlich reagiert. | Bei hochfrequenten Mustern empfiehlt sich der Einsatz einer leichten Unschärfe oder einer höher auflösenden Kamera. |
Zukünftige Entwicklungen: Was kommt als Nächstes?
Die Technologie entwickelt sich ständig weiter. Wir sehen LED-Wände mit höheren Bildwiederholraten, verbesserten Kameramodi und Systemen, die sich automatisch an die erkannten Kameraeinstellungen anpassen. Auch die Kameratechnik schreitet rasant voran: Neue Sensoren nutzen ausgefeilte Verarbeitungsalgorithmen, um elektronische Artefakte in der Kamera zu minimieren.
Anwendungsbeispiele aus der Praxis
VeranstaltungsproduktionBeim Filmen eines Live-Konzerts mit LED-Bühnenhintergrund besteht das Ziel oft darin, dem Publikum ein nahtloses visuelles Erlebnis zu bieten und gleichzeitig Aufnahmen in Sendequalität für Streaming oder Aufzeichnung zu erstellen.
FirmenveranstaltungenLED-Wände werden bei Unternehmenspräsentationen immer häufiger eingesetzt, wo Führungskräfte vor dynamischen, markenspezifischen Hintergründen gefilmt werden müssen.
Film und FernsehenVon futuristischen Science-Fiction-Szenen bis hin zu zeitgenössischen Dramen, die in Büros oder Wohnungen spielen, bieten LED-Wände eine beispiellose Flexibilität bei der Gestaltung von Hintergründen, die sich im Handumdrehen verändern lassen.
Fazit: Ihr Weg zur LED-Wand-Meisterschaft
Bei der Fotografie von LED-Wänden geht es im Wesentlichen darum, das Zusammenspiel zwischen Kamerasensoren und LED-Displaygittern zu verstehen. Die technischen Herausforderungen von Stroboskop-Effekten und Moiré-Mustern erfordern sowohl technisches Wissen als auch kreative Problemlösungsfähigkeiten.

Wichtigste Erkenntnisse:
• Stroboskopische Effekte Tritt auf, wenn die Bildwiederholfrequenz der Kamera mit der Aktualisierungsfrequenz der LED-Wand in Konflikt steht; Lösung: Bildwiederholfrequenzen angleichen oder Verschlusszeiten anpassen.
• Moiré-Muster Ursache sind Interferenzen zwischen Sensor und LED-Gitter; Lösung: Kameraposition oder -winkel ändern oder leichte Defokussierung verwenden.
• Abstand ist dein Freund – Kleine Positionsanpassungen können die Ergebnisse dramatisch verbessern.
• Ausführliche Tests durchführen – Jede LED-Wandkonfiguration reagiert unterschiedlich auf die Kameraeinstellungen
InhaltsbewusstseinManche LED-Inhalte sind von Natur aus kamerafreundlicher als andere.
Durch die Anwendung dieser Prinzipien – das Verstehen des Timing-Konflikts, das Einsetzen geeigneter technischer Korrekturen und das Experimentieren mit der Positionierung – können Sie LED-Wandaufnahmen von einer technischen Herausforderung in ein wirkungsvolles kreatives Instrument verwandeln.